Stage 1 of 2
Install OLMod
Overload has no mod support of its own. OLMod is the community loader that adds it — and a great deal else besides. It is a set of files you drop next to the game, and a different executable you launch. Nothing about your existing Overload install is modified or moved.
Find your Overload directory
Everything in both stages goes into one folder: the one containing
Overload.exeand theOverload_Datasubfolder. Find it once now and the rest of this guide is copy-and-paste.Steam
Right-click Overload in your library → Manage → Browse local files. Steam opens the folder for you. If you would rather type the path, the default is:
Default Steam path C:\Program Files (x86)\Steam\steamapps\common\OverloadIf you moved the game to a second drive with a Steam Library folder, the tail of the path is identical and only the drive letter and library root change. The screenshot further down this page is from a library on
F:\SteamLibrary, which resolves to:A secondary library F:\SteamLibrary\steamapps\common\OverloadGOG Galaxy
Select the game → the settings icon next to Play → Manage installation → Show folder. The default is
C:\Program Files (x86)\GOG Galaxy\Games\Overload.Epic Games Store
Library → the three dots on Overload → Manage → the folder icon beside the install size. The default is
C:\Program Files\Epic Games\Overload.Linux and macOS
Look for
Overload.x86_64orOverload.appinstead. A common Steam location on macOS is:macOS Steam path ~/Library/Application Support/Steam/steamapps/common/OverloadYou should see
The folder you are standing in contains
Overload.exe(or the Linux/macOS equivalent) and a folder namedOverload_Data. If either is missing, you are in the wrong place — most often one level too high, incommonrather thancommon\Overload.Download OLMod 0.5.14
v0.5.14 · 19 October 2025
Get it from the official project page. Do not take OLMod from a re-upload — it is a loader with deep access to the game process, and there is no reason to source it from anywhere but the people who build it.
olmod.overloadmaps.com
The project's own download page, with a short getting-started section for multiplayer. This is the link to use if you are unsure.
Open the download page →GitHub releases
Every release, with source and changelogs. Useful if you want an older build or want to read what changed between versions.
Browse all releases →The direct link for the current build is olmod-0.5.14.zip.
Extract it into the Overload directory
Open the downloaded
olmod-0.5.14.zipand extract its contents directly into the folder from step 01 — the same level asOverload.exe.After extracting you will have gained roughly these files:
Overload\ ├─Overload.exe← the game, untouched├─Overload_Data\← the game, untouched├─UnityPlayer.dll← the game, untouched│ ├─ olmod.exe ← launch this from now on ├─ GameMod.dll ← all of OLMod's game logic ├─ 0Harmony.dll ← the patching library both OLMod and this mod use ├─ olgetdata.exe ← extracts stock weapon/robot data ├─ olmodsettings.json ← OLMod's own settings ├─ olmodchanges.txt ← full OLMod changelog ├─ olmodserver.bat ← starts a LAN server ├─ olmodserverinet.bat ← starts an internet server └─ olmod.sh / olmod.so / olmod.dylib ← Linux and macOS launchersalready there added by OLModThe Linux and macOS files are in the Windows package too. They are harmless; ignore them.
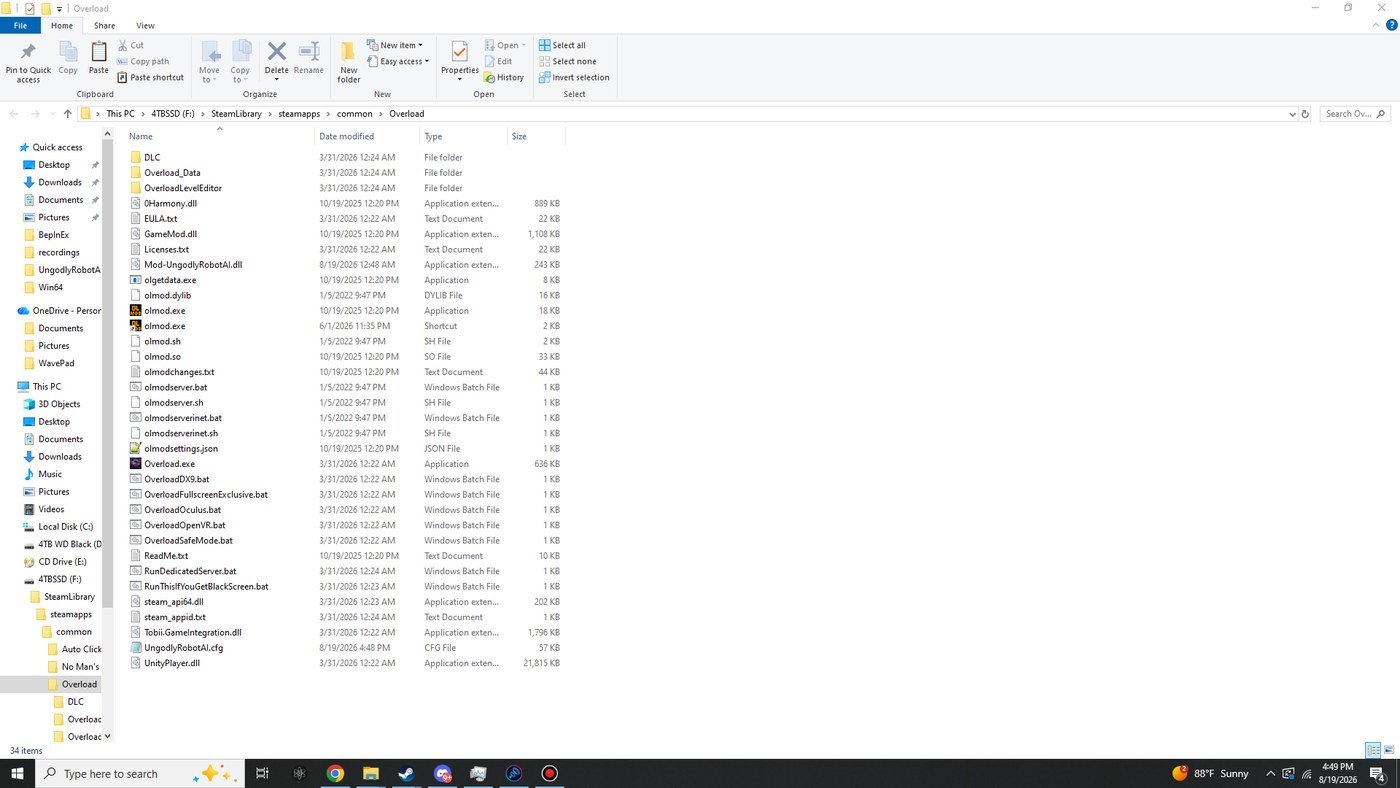
A real Overload directory after this step, in a Steam library on a second drive. Everything OLMod added — olmod.exe,GameMod.dll,0Harmony.dll,olgetdata.exe, the.batserver scripts,olmodsettings.json— sits in the same flat list asOverload.exeandOverload_Data. No subfolder. (The two UngodlyRobotAI entries are stage 2; they are not there yet at this point.) Click to open at full size and read the paths.You should see
olmod.exeandGameMod.dllare sitting in the same folder asOverload.exe, not one level down.Give Linux and macOS one extra command
Linux / macOS only
Windows users can skip this. On Linux and macOS the launcher script arrives without the executable bit, so mark it from a terminal in the game directory:
Terminal cd "~/Library/Application Support/Steam/steamapps/common/Overload" chmod +x olmod.shLaunch through olmod, not Overload
From here on,
olmod.exeis how you start the game.Overload.exestill works and still gives you an entirely stock, unmodded game — which is genuinely useful for comparison, so leave it alone.Pick whichever of these suits how you play:
Method How Worth knowing Double-click Run olmod.exestraight from the game folder.Simplest. No Steam overlay, no playtime tracking. Desktop shortcut Right-click olmod.exe→ Send to → Desktop (create shortcut).The one to use — stage 2 needs somewhere to put -modded, and a shortcut's Target field is that somewhere.Through Steam Games → Add a Non-Steam Game to My Library, browse to olmod.exe.Keeps the overlay and playtime. Set launch options on the new entry, not on Overload itself. Batch file A one-line .batin the game folder.Best if you want several presets side by side. Covered fully in stage 2. Confirm OLMod loaded
Start the game and look at the top right of the main menu. A stock Overload prints only the game version there. With OLMod running, the OLMod version is printed alongside it.
You should see
The main menu reads something like OVERLOAD VERSION 1.1 build 1886 OLMOD 0.5.14. You can see exactly this in the screenshot at the top of the start page — it is the green text running down the right-hand edge behind the panel.
If the banner does not appear, do not continue to stage 2 — nothing there can work until this does. Go to troubleshooting instead.